Advance your ipywidget app development with Reacton — A pure Python port of React for faster development

TL;DR
Are you ready to advance your ipywidget app development? Introducing Reacton — A pure Python version of React that simplifies, speeds up, and improves the robustness of your code. Plus, we’re building a new framework, Solara, that combines the power of Reacton with the aesthetics of ipyvuetify and inspiration by NextJS.
What’s with ipywidgets, anyway?
I have always been a fan of ipywidgets. When I was working in astronomy we needed custom visualizations and user interfaces to effectively explore data, which is where the Jupyter notebook and ipywidgets came in. In my opinion, ipywidgets is the best framework available for working within the Jupyter ecosystem (and outside of it as well, as I will discuss later).
One of the standout features of ipywidgets is its bidirectional communication capabilities. Every property can be changed from the front end and the Python process, which is a feature that many other frameworks lack. Additionally, ipywidgets is a mature, well-maintained framework backed by a team of talented developers.
Fast forward a few years, and I transitioned from working in astronomy to consulting and freelancing. I helped create ipyvuetify to enable the building of more modern interfaces within the Jupyter notebook. I had the opportunity to work with QuantStack on the development of Voilà. In addition, I contributed to the creation of Glue-Jupyter and Jdaviz. These are applications that can be used both inside and outside of the Jupyter notebook with the help of ipywidgets and ipyvuetify.
This experience led us to the development of Reacton and Solara, which address the limitations of core ipywidgets and enable the creation of more powerful, flexible data apps.
Common challenges when using ipywidgets
As we developed custom in-house applications using ipywidgets and ipyvuetify, we encountered some challenges. As the applications grew in complexity, they became increasingly difficult to manage, which is a common issue in software development. This led us to ask:
What if there was a more intuitive, flexible way to develop these applications? Can we create a better way to approach this from both a developer and client perspective? How can we address these challenges while still using existing libraries?
One way to illustrate these challenges is through a code snippet:
Case 1: A button with counter
Here is a simple example of a button that tracks the number of times it is clicked.
import ipywidgets as widgets

clicks = 0  # issue 3
def on_click(button):
    global clicks  # issue 3
    clicks += 1
    button.description = f"Clicked {clicks} times"     # issue 1
button = widgets.Button(description="Clicked 0 times") # issue 1
button.on_click(on_click)  # issue 2
display(button)
This code can be run in the Jupyter notebook to produce a button. Every time the button is clicked, the label will update to show the number of clicks. This simple example highlights some common problems with using ipywidgets:
- The button description text is repeated in two places (initialization and the event handler).
- An event handler is attached, but without a defined life cycle, it can be difficult to know when to detach it to avoid memory leaks.
- The “clicks” variable is stored in the global scope, which may be concerning for some developers.
- The code is not easily reusable or composable.
These issues can be addressed, but it requires the developer to come up with their own solutions. Without a standard approach, different developers may create solutions that are incompatible with each other.
To overcome these challenges, we need a standardized way to build “components” using ipywidgets. This would enable more efficient, flexible development of complex applications.
Case 2: A Markdown Widget/Component
A common challenge when using ipywidgets is the lack of a clear path forward for creating custom widgets or components. This is illustrated by the following GitHub issue.
The issue thread includes a suggestion for creating a markdown widget/component using the following code:
import markdown
from ipywidgets import HTML

html = markdown.markdown("""# Markdown""")
HTML(html)
However, this approach does not provide a clear way to create a reusable Markdown widget. It is unclear whether to inherit from a specific class, or whether to compose a new widget using existing components like VBox or HBox. There is also no obvious way to update the markdown content once the widget has been created.
Without a standard approach, it is likely that different developers will come up with incompatible solutions, making it difficult to build an ecosystem of reusable and composable components.
What can we learn from history and other languages or frameworks?
The ipywidgets ecosystem has not adopted a clear vision of how to build a larger application. Should we consider using a paradigm like ReactJS, but for Python?
When looking for solutions to the challenges discussed earlier, we considered various design patterns like MVC, MVP, and MVVM. However, these patterns often add unnecessary boilerplate and do not provide a clear path forward for building complex applications with ipywidgets.
We also looked at other languages and frameworks and found that ReactJS stands out as a highly effective platform for building web applications. ReactJS is widely used and well-supported and has evolved beyond the traditional DOM manipulation approach.
The ipywidgets ecosystem has not adopted a clear vision of how to build a larger application. Should we consider using a paradigm like ReactJS, but for Python?
Why React?
You may be wondering: Why React? Why not a different web technology like Vue, Svelte, or Angular? While these frameworks may be effective in solving similar problems, they do not map as well to Python because they require mixing HTML and JavaScript. However, we don’t have an HTML equivalent in Python/ipywidgets. We simply want a solution that can be easily implemented using the Python programming language. React stands out among other frameworks for its maturity and widespread adoption. Here are some reasons why we chose to use it for building our applications:
- It has proven to be effective and reliable over time
- There are plenty of resources available to support and enhance its functionality
- Countless smart brain time has been spent on this JavaScript framework. If we can tap into this resource, we can avoid many roadblocks
What is Reacton?
Reacton is a port of the React concept to a pure Python implementation. It was designed to simplify and standardize solutions for building a more cohesive and unified ecosystem of reusable and composable components.
One key difference between Reacton and ReactJS is that Reacton doesn’t have to worry about browser performance, making Reacton simpler than ReactJS. While implementing Reacton wasn’t easy, the project is relatively small, with under 2000 lines of code, making it easy to understand and work with. Additionally, it has been tested throughout, and the code-base has extensive test coverage.
Are you ready to give Reacton a try?
Show me the money, ehm examples
Let’s start with creating a ButtonClick component to replace the earlier example.
import reacton
import reacton.ipywidgets as w

@reacton.component
def ButtonClick():
    button = w.Button(description="Hi")
    return button
Note that we import reacton.ipywidgets as w instead of importing ipywidgets directly. This module wraps all ipywidgets into Reacton widget components.
This code defines a user component, which is decorated with the @reacton.component decorator. When calling the component (i.e. element = ButtonClick()), the function body is not executed immediately. Instead, it returns an element object that holds all information (a reference to the original function and all arguments passed). Reacton will execute the function body at a later time, and will turn the elements into actual ipywidgets: i.e. Reacton is declarative.
Type checking
One of the benefits of using Reacton is the ability to take advantage of type-checking. The components that wrap ipywidgets are fully typed, allowing for early detection of type errors.
For example, the following code would generate a type error message:
@reacton.component
def ButtonClick():
    button = w.Button(description=1)  # description should be a str
    return button
The mypy output gives:
error: Argument "description" to "Button" has incompatible type "int"; expected "str"While type-checking may not be necessary for every project, it can be a useful tool for catching errors and ensuring code quality. Reacton’s type-checking capabilities can help reduce the need for extensive testing and lead to more efficient and productive development.
Autocomplete
The wrapper component also allows static code analysis tools, like VSCode, to provide auto-completion. This is something that standard ipywidgets cannot currently offer. In the example below, we see how VSCode provides suggestions for the Button component, thanks to the typed components in Reacton.
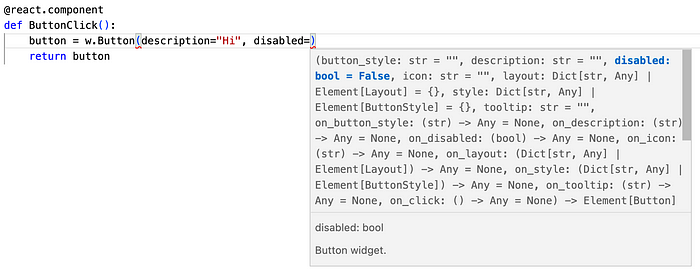
Both these options allow you to code faster, with more confidence, with fewer runtime errors, and with your CI checking for type errors — fewer chances of bugs.
Displaying your component
We have now declared a component; how do we turn it into a widget we can display?
The long answer
# create an element out of the component
element = ButtonClick()
# ask react to render the element into a widget
widget, render_context = reacton.render_fixed(element)
# ask Jupyter to display the widget
display(widget)
The short answer
In the notebook, you can just make this the last expression, and it will do the above for you:
ButtonClick()Adding a click event handler
The long answer
We cannot simply attach an event handler like with a normal ipywidget Button because the w.Button object is an element, not the real ipywidget. This element will only be turned into a widget once the component is rendered. However, a reference to the underlying widget can be obtained inside the use_effect handler using get_widget.
@reacton.component
def ButtonClick():
    button_element = w.Button(description="Hi")

    def attach_event_handler():
        # get a reference to the real widget
        button_widget = reacton.get_widget(button_element)
        def on_click(button):
            print("Yes, you clicked")

        def cleanup():
            button_widget.on_click(on_click, remove=True)
        # add the event handler, and return the cleanup
        button_widget.on_click(on_click)
        return cleanup

    reacton.use_effect(attach_event_handler)
    return button_element

ButtonClick()  # display button in Jupyter
The function passed to use_effect gets called after the render phase, when the widget is created, allowing us to attach our event handler to the real widget, using get_widget. Note that the return value of use_effect should be a cleanup function that will be called when the components are removed. In our case, we detach the event handler. This ensures that there are no memory leaks. Another important note: the reacton.get_widget function should only be called inside of the use_effect handler, not elsewhere.
This pattern of using use_effect and its cleanup function allows for robust connection between components and external systems, without memory leaks.
Short answer
Reacton provides built-in support for common event handlers like on_click. In the example below, the on_click event handler is defined locally within the component. This is considered idiomatic, as the event handler will only be used within this specific component.
@reacton.component
def ButtonClick():
    # this handler can also be defined outside of the component
    # but it's considered idiomatic define it locally
    # especially if the event handler will not be used outside
    # of this component
    def my_click_handler():
        print("Yes, you clicked")
    button = w.Button(description="Hi", on_click=my_click_handler)
    return button
ButtonClick()
In addition, Reacton also supports event handlers for each property in ipywidgets. For example, if a widget exposes the property “value”, we can also bind an on_value callback to listen for changes.
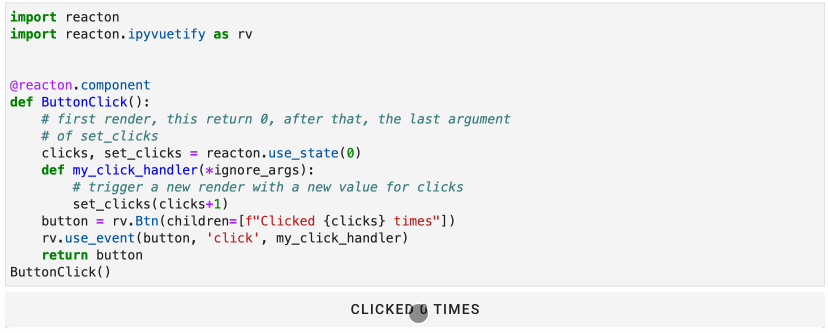
Adding state
State management in Reacton is handled using the use_state hook, which allows you to create a local state variable and a function to update its value. This is demonstrated in the code below:
@reacton.component
def ButtonClick():
    # first render, this return 0, after that, the last argument
    # of set_clicks
    clicks, set_clicks = reacton.use_state(0)    def my_click_handler():
        # trigger a new render with a new value for clicks
        set_clicks(clicks+1)    button = w.Button(description=f"Clicked {clicks} times",
                      on_click=my_click_handler)
    return buttonButtonClick()
In this example, the initial render will show the button with a description of “Clicked 0 times”. When the button is clicked, the my_click_handler function is called, which updates the value of clicks by calling set_clicks(clicks+1). This triggers a re-render, and the button will now show “Clicked 1 times”.
State management in Reacton follows the same principles as ReactJS, with only the component that creates the state being able to modify it. This ensures that there is no global state that can be mutated from arbitrary locations.
You can also try out this example directly using Jupyter Lite
Hooks? Hooks!
The use_effect and use_state functions in Reacton are called “hooks”, which we borrowed from ReactJS. These functions can only be called within a component and have specific rules that must be followed: they cannot be called conditionally or in a loop. This is because Reacton uses an internal counter to keep track of which hook is being called, and calling them in a different order or conditionally can lead to incorrect values being returned.
Let's take a look at how this can go wrong.
@reacton.component
def MyFilter(df):
    # first call to use_state
    column, set_column = reacton.use_state(str(df.columns[0]))
    # second call to use_state
    if is_numeric_dtype(df[column]):
        min_value, set_min_value = reacton.use_state(0)
    else:
        picked_value, set_picked_value = reacton.use_state("Dog")
    # oops, now min_value and picked_value refer to the same 'state'
    ....
In the example above, calling use_state(0) on the first render sets our second "state slot" to an integer with value 0. If the component re-renders and triggers the use_state("Dog") code path, picked_value will be set to the integer 0! This is because it is the second call to use_state. To fix this, we can simply remove the condition and call use_state for both the integer and the string versions.
While they may not seem significant at first, hooks are incredibly powerful. They are composable, meaning you can call hooks within other hooks, as long as they are not called conditionally. By putting most of your non-UI logic in hooks, you can greatly simplify your UI components and reuse your hooks throughout your code.
The Markdown Component
Getting back to the issue of creating a reusable Markdown widget, the solution should be obvious to people familiar with React
import markdown

@reacton.component
def Markdown(md: str):
    html = markdown.markdown(md)
    return w.HTML(value=html)

Markdown("# Reacton rocks")
Although there may be a variety of Markdown libraries that users may choose from, the ability to reuse components, in the same way, ensures a consistent and efficient solution. For instance, when creating a Markdown editor, all users can utilize the Markdown component in the same way.
@reacton.component
def MarkdownEditor(md : str):
    md, set_md = reacton.use_state(md)
    with w.VBox() as main:
        w.Textarea(value=md, on_value=set_md)
        Markdown(md)
    return main

display(MarkdownEditor("Mark-*down* **component**"))
Understanding the flow of data is key to understanding how Reacton works. Data flows up using an event handler (on_value will trigger set_md, which will change md in the next render phase). Data then flows down via argument; md gets passed down to the TextArea and Markdown components.
Containers as context managers
In the last example, we introduced another feature by using the VBox as a context manager. You may have expected to see something like this:
@reacton.component
def MarkdownEditor(md : str):
    md, set_md = reacton.use_state(md)
    return w.VBox(children=[
        Markdown(md),
        w.Textarea(value=md, on_value=set_md)
    ])display(MarkdownEditor("Mark-*down* **component**"))
This approach works well, but if you have a component with many nested containers, it can become difficult to manage the square bracket notation. Instead, we can use an element (such as a VBox container) as a context manager, and all elements created that are not explicitly assigned to another element will be added to its children.
In principle, normal ipywidgets could support this, but it would do an assignment of the children after the creation of the VBox, which would result in a flicker (first showing an empty VBox, then with its children). This is another example of where a declarative system is superior to an imperative one.
Using an element as a context manager in this way can help to simplify and improve the structure of your code, particularly when working with complex, nested components. It also provides a more intuitive and straightforward way to add child components to a container, making it easier to manage and maintain your code.
Conditional rendering
In the previous example, we demonstrated the major advantage of using Reacton. We can do more. In the next example, we made the Textarea conditional, toggled behind an “Edit” ToggleButton.
@reacton.component
def MarkdownEditor(md : str):
    md, set_md = reacton.use_state(md)
    edit, set_edit = reacton.use_state(True)
    with w.VBox() as main:
        Markdown(md)
        w.ToggleButton(description="Edit",
                       value=edit,
                       on_value=set_edit)
        if edit:
            w.Textarea(value=md, on_value=set_md, rows=10)
    return maindisplay(MarkdownEditor("Mark-*down* **component**"))
On the first render, edit is True, so all components are rendered. The on_value event handler is also attached to the TextArea component. If we toggle the "Edit" button, changing edit to False, Reacton calls the component's render function again and detects a difference between the previous render phase and the current one. During what is called the reconciliation phase, Reacton applies the necessary changes to the widgets to bring their state up to date. In this case, it will:
- Change the
ToggleButton’svaluetoFalse - Remove the
TextAreaas a child of the mainVBox - Remove the
on_valueevent handler from the TextArea - Destroy the
TextAreawidget
Manually performing these tasks without the help of a framework like Reacton would be tedious and error-prone. This type of “conditional rendering” is something that developers typically avoid without the assistance of a framework like Reacton. With Reacton, it becomes simple and straightforward.
What is next
A common library?
I’m not the only person taking this route. Ryan Morsehead has already created IDOM, but this library relies on ReactJS for the reconciliation phase. Also, ipywidgets adds another layer of complexity because widgets may share a particular widget. This means that an element passed down to two component trees needs to be able to use the same widget.
While we both like to see a common codebase, this definitely won’t be a walk in the park.
A fairly manageable task, however, is to provide a shared package for hooks that will dispatch to the currently used implementation. This allows us to use a hook written for Reacton to be used in IDOM, and vice versa.
Once a common library for rendering/reconciliation exists, the same procedure can be repeated for Qt or other libraries, possibly Bokeh or Textual.
Learning
You may be excited about the new Reacton library and want to use it, but how do you get started and become an expert in Reacton?
The starting point for Reacton is the Reacton-documentation, however, there is a much larger resource available. A lot can be learned from the JavaScript world. For instance, if you want to know how to use use_reducer and use_context, you could start by searching on YouTube and following some ReactJS tutorials. Code-wise you should mentally translate from pascal casing (useReducer) to snake case (use_reducer).
The vast amount of information available on ReactJS is one of the biggest advantages of using Reacton. YouTube, StackOverflow, books, and personal blogs are all great places to find valuable resources on ReactJS and related topics. However, you don’t have to rely solely on external resources to learn about Reacton. The Reacton website includes examples and basic documentation, including information on hooks, which you can use to get started:

Or go directly to one of our examples:
Conclusions and the Future
Do you want to build powerful, reusable components and hooks? With Reacton, you can create robust applications using ipywidgets that would be difficult or impossible to build with pure ipywidgets. Our clients love the enhanced robustness, performance, user experience, and aesthetics of our applications, and we love being able to create better products with Reacton.
Reacton is open source, MIT licensed, and our git repo is on GitHub.

But that’s not all. We are currently developing a new framework called Solara, which combines the power of Reacton, the material design of ipyvuetify, and a new deployment server. Solara makes it easy to create powerful web apps with Python, using proven technology (React/Reacton) and multi-page capabilities both inside and outside Jupyter notebooks.
If you are interested in Reacton and Solara, we are currently running a beta program. We are still refining the API, so access is limited to a select group of users. If you would like to try Solara and provide feedback, please let us know how Solara can solve your problem. We will give you access to the beta program and invite you to our Slack channel to collect feedback from a small group of users. As an added bonus, we are offering free consultancy in the form of a video call to anyone who can describe their use case in an interesting way.
Sign up for the Solara beta program, newsletter, or let us know your use case to learn more by clicking the logo below.

Or follow me on Twitter at https://twitter.com/maartenbreddels